
Pardot UTM Parameters “How To”
This is part two of a two part series on Pardot Marketing Attribution using UTM Parameters.
How to implement UTM Parameters in Pardot for Marketing Attribution
So we’ve talked about the divide- we’ve talked about what UTM codes are and how to create them… Now let’s talk about how to configure Pardot, your forms and landing pages to capture these parameters, pass them into Pardot, and sync over to Salesforce, where you can run reporting all the way down the funnel from leads to closed won opportunities.
Step 1. Create fields in Salesforce and Pardot
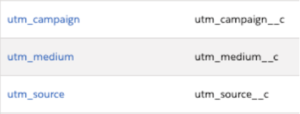
The first thing you’re going to want to do is create, or have your admin create two custom fields in Salesforce, either on your lead or possibly your contact record if you don’t use leads. (*using this method you only need to create utm_campaign and utm_medium, and Source will feed the standard Pardot and Salesforce “Source” field) You’re also going to want to probably keep them hidden from page layouts, unless you want your end users to see this information. Then, you’re going to want to create and map those fields to the opportunity.
- utm_source (optional)
- utm_campaign
- utm_medium
- utm_content (optional)
- utm_term (optional)
Step 2. Map fields in Salesforce to Pardot
Now, you’re going to go over to Pardot, and create those custom fields in Pardot on the Prospect record, and then map the Pardot fields back to the Salesforce fields. If you don’t see them show up immediately, don’t forget that sometimes you have to click the little refresh icon to pull in newly created fields.
Step 3: Add fields to Pardot Forms
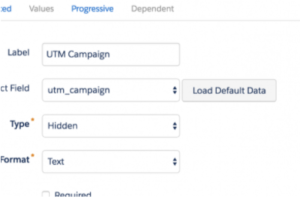
Utm_xxx
- Prospect Field
- I.e. Source, utm_campaign, utm_medium, etc
- Type
- Hidden
- Data Format
- Text
Do not make field required!
The next step is we’re going to want to add those 3 fields as hidden fields on every form we want to track. We’re going to label the fields, choose the appropriate Prospect field (we may have created), choose “hidden” field as the type, and select text as the data format. A special note- MAKE absolutely sure you’re not requiring these fields, as if they’re hidden and required, if the prospect didn’t come from a utm tracked link, they will be unable to complete the contact form.
When we’re done, we should have three new fields on all of our forms. FYI, we can do this with form handlers as well, but we would need to add the hidden fields to our form handler and completed the next step we’re going to talk about, adding the javascript to our page. However, we might need to make some adjustments to the javascript to match the selectors we define within our form handler code.
Step 4: Copy the following javascript to landing page or form
The next step is a bit technical, but it’s pretty much copy paste, so even if we have no idea what this code means, we should be able to just copy the content. The code itself must be added in one of two places; within the landing page template, or my method; in the code section of the “below form” section of our form. Please also note If we don’t use the field names outlined in this tutorial, we might need to update the JavaScript to include the correct field names.
 <script type="text/javascript">
// Parse the URL
function getParameterByName(name) {
name = name.replace(/[\[]/, "\\[").replace(/[\]]/, "\\]");
var regex = new RegExp("[\\?&]" + name + "=([^&#]*)"),
results = regex.exec(location.search);
return results === null ? "" : decodeURIComponent(results[1].replace(/\+/g, " "));
}
// Give the URL parameters variable names
var source = getParameterByName('utm_source');
var medium = getParameterByName('utm_medium');
var campaign = getParameterByName('utm_campaign');
// Put the variable names into the hidden fields in the form. selector should be "p.YOURFIELDNAME input"
document.querySelector("p.source input").value = source;
document.querySelector("p.utm_medium input").value = medium;
document.querySelector("p.utm_campaign input").value = campaign;
</script>
Code must be added:
-
- within Landing Page Template, or
- within form in the “below form” section
Step 5: Embed the form on your website
- Navigate to form in Pardot
- Click the arrow, and select View HTML code from the dropdown.
- Copy the iframe code, and paste it into your web page source code.
Now, if we only use Pardot landing pages, we are done and ready for testing. However, many of us use embedded forms on our websites. As technically the traffic to an embedded form uses 2 separate websites (our website and Pardot’s hosted form), utm values can get lost along the way.
As a refresher, these are the steps we’ll need to complete, which may require access to our CMS, or to get in touch with your web developer, website admin or IT. We simply go to the form, click on the button that says View HTML, and copy that code, placing it wherever you want the form to live on your website.
Step 6: Modify iFrame adding ID and add JS linking
So as we’re technically talking two separate web pages here here (your standalone instance and the Pardot-hosted asset), we need to add some additional code to our website to allow us to pass the URL parameters from the parent page to the embedded Pardot iFrame form. Again, this gets a little technical, but we can simply copy paste the code below, and I typically instruct developers to copy this script before the closing body tag in our web pages HTML. And remember, this script needs to be on every page where a form lives, so it’s typically good to have this on every page.
<iframe src="https://go.pardot.com/l/xxxx/xxxx-xx-xxx/xxxxx" width="100%" height="500" type="text/html" frameborder="0" allowTransparency="true" style="border: 0" id="myiframe"></iframe>
Step 7: Add JavaScript to your website
We’re going modify the existing iframe code we copied on the step 5, and modify the existing website embed code to add an “id.” Here we’re using the id “myiframe” and we must use the same identifier in the iframe as we use in the JavaScript (in Step 6).
<script type="text/javascript">

var iframe = document.getElementById('myiframe');

iframe.src = iframe.src + window.location.search;

</script>
Step 8: Test that parameters are passed through at every step
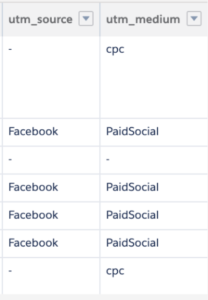
The last thing we’re going to want to do is test to make sure the values are being captured and stored at every step. Make sure we go all the way thru, and if something is broken, look at our Pardot field mapping behavior, as well as our Salesforce Object mapping.
Once we’ve ensured everything is working, we’re ready for the fun stuff, and that’s reporting!!
UTMs Bridge the Gap
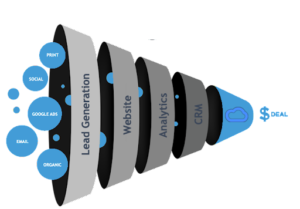
By passing UTM values all the way from advertising to our website through to Pardot and Salesforce, we finally have visibility into the marketing attribution lifecycle

Closing the Loop: UTMs connect the steps of a customer journey
If we add this strategy to Connected Campaigns, and Campaign Influence and maybe B2BMarketing Analytics, we start to be able to tell the full story of your customer journey.
And beyond just Salesforce, you can use UTMs in a variety of other places.
- Use utms in your analytics platforms (i.e. GA reporting)
- Segment UTMs in Pardot
- Sales Cloud and Pardot Einstein predictive qualification
- Salesforce reporting measuring ROI by channel, by campaign
By understanding how to leverage UTM analysis, we’ll become smarter and better marketers… by understanding campaign performance better than ever, we’ll be able to make better marketing decisions, drive more revenue to our companies, becoming more valuable as a marketers in the process.



Comments are closed.